Friday, July 30, 2010

Chilly Cucumber Cups w/Spicy Mousse - Simple Saturday

Here's one of those "it looks so fancy, but it's not" kind of appetizers.
Chilly Cucumber Cups
w/Spicy Avocado Mousse
and a Mini-Melon topper
The ingredients just sing Summer Time and everything can be prepped ahead of time, held in the refrigerator and put together when needed for serving. I've made these from 100 at a time for parties to just 12 of them for a luncheon (amuse bouche). The flavor combination is bright and spicy.
RECIPE: Cucumber cups w/Spicy Mousse

1 English Cucumber (but others will do fine, also)
1 tsp. chopped Jalapeno pepper
1/2 Avocado
1/2 lime (juice and 1 tsp. zest)
1/2 cup (4oz) whipping cream
1 tsp. sugar
1/2 cantaloupe
salt/pepper to taste

To make the stripes down the cucumber: drag the tip of a peeler or a wide skewer down the length of the cucumber in even intervals.
Cut the cucumber into 1/2 inch slices, scoop a small amount out of each middle and drain upside down on a paper towel to remove moisture.
To make the mousse: In a bowl, mash the avocado with the minced Jalopeno, the juice and the zest, salt & pepper. In a separate bowl, whip the cream with the sugar until it's fluffy and soft. Add the avocado mixture and fold all together, leaving no white streaks.

To make the Mini-Melon ball toppers: Using a small melon baller, scoop out the melon balls and drain on a paper towel (you could also cut small cubes from the melon if you don't have a melon baller handy).

All of these ingredients can be held, separately, in containers in the refrigerator over night and put together the next day.
To SERVE: To each Cucumber cup, add a dollop (or use a pastry bag) of Avocado mousse to fill the cup up, then lightly press one melon ball to top. * optionally - sprinkle a few grains of Olive Salts or Fleur de Sale.
You are now fancy (and even healthy)! Happy Summer.

Tuesday, July 27, 2010

Ice Cream Cake; It's the Bombe - Daring Bakers July 1010

I scream, you scream, we all...should stop screaming and eat!

Matcha Swiss Roll Cake w/Raspberry Curd
and Raspberry Ice Cream Bombe

I sincerely tried to make that title shorter, but could not bear to leave any of the delicious flavors out.

The July 2010 Daring Bakers’ challenge was hosted by Sunita of Sunita’s world – life and food. Sunita challenged everyone to make an ice-cream filled Swiss roll that’s then used to make a bombe with hot fudge. Her recipe is based on an ice cream cake recipe from Taste of Home.-

After making my Watermelon Pickles, I was still inspired by those summery colors of greens and pinks with dark chocolatte specks. If you look at the pictures with your eyes crossed just a bit, I bet you'll see the watermelon-ish inspiration. Yes? No?

The Daring Baker's challenge used chocolate cake and fudge sauce, but we could change up the flavors to suit our taste. Whenever I have the chance to make a sponge cake (like the swiss cake) I automatically think of Matcha Green Tea. It just gives a wonderful earthy taste and a breather from the sweet ice cream and filling. Green Tea is so good for you, and that makes eating dessert GOOD for me - what's not to like.
I also changed up the fudge sauce for a Raspberry curd. Seriously, if you make just one thing from this post - MAKE the Raspberry curd. I tweaked it a few times and finally got the ratio's just right and it is so tasty, tart and fruity.

The Ice Cream is a recipe from school with the addition of fresh Raspberries that have been crushed in Sugar and Lemon juice first, then added after the Creme Anglaise is cooked for making the ice cream.

Like a lot of these Daring Baker's challenges, at first glance it can be overwhelming. Take a minute, look through the steps and you'll see that it is not only worth it, but not that complicated. Besides, anywhere in the process you can stop and just eat what you have so far; it's just that good.
RECIPES (as used)

Matcha Green Tea Sponge Cake
(adapted from the Swiss Roll Ice Cream Cake - inspired by the recipe of the same name from the Taste of Home website)
PreHeat oven to 400F. Lightly oil an 11 x 16 inch sheet pan, and cover bottom with parchment.

Ingredients:
6 medium sized eggs
1 C. caster sugar
6 TBS. all purpose (plain) flour + 1 TBS. of natural unsweetened cocoa powder.
3 Tbls. Matcha Green Tea Powder

Sift together the Flour and Cocoa Powder and hold.
In a bowl, whip together the eggs, sugar and matcha powder until the mixture is light and frothy.

Fold in the sifted flour mix. (* remove 1 cup of batter and reserve if you want to make the darker lines in the pastry) Pour into the prepared pan, making sure its even all around.

(*To make the texturing lines: Add 1 Tbls. Matcha powder to reserved 1 cup of batter and stir well. Using a pastry bag or cone bag with tip cut away; drizzle lines up and down on top of the poured batter in the baking pan. Using a skewer, drag through each line, creating a pattern along the way. *)
Bake in the center of the oven for 10-12 minutes.
Remove the pan and cake and allow to cool for a few moments. While warm, turn out onto a clean towel sprinkled with castor sugar, and gently roll from the short end. This will prepare the cake for rolling with filling in it.

For the filling
:
2 C whipping cream
1 tsp. vanilla extract
5 TBS. of caster sugar

Whip these together until stiff peaks form. Keep cool.

When cake is completely cooled, Roll out and spread the filling on the cooled cake. Roll up again, lay with seam side down and cover in plastic wrap. Keep in Refrigerator until ready to proceed.
Vanilla Ice Cream
2 1/2 cups heavy whipping cream
1 tsp. vanilla extract
1/2 cup sugar

Combine all ingredients and beat until frothy. Chill and pour into Ice Cream maker as directed by your product. This can also be made without ice cream maker by whipping ingredients together, then placing in a freezer proof container and freeze til almost firm. Take out and beat, again until creamy. Return to freezer and do this about 2 more times.
RASPBERRY CURD:
In a saucepan, stir together on Med. -
1 egg, plus 1 egg yolk,
1/2 cup sugar,
1 (5-6 oz.) basket of raspberries,
1 1/2 Tbls. Lemon juice,
pinch of salt.

Heat until bubbly and simmering, stirring constantly til thickened.
In a bowl, add 2 Tbls. butter, and strain the Raspberry mixture into the bowl. Then, stir the butter and curd together completely. Chill in a container for 2 hours or over night.

RASPBERRY ICE CREAM:
1 basket of raspberries
1 1/2 cups whole milk
2 eggs
2 yolks
3/4 cup sugar (plus 1/4 for berries)
1 1/2 cups heavy cream

Heat Milk in a double boiler.
In a bowl, whisk eggs, yolks and 3/4 cup sugar until light and frothy.
Temper the warm milk into the egg mixture, then return the mixture to the top of the double boiler , add the cream and cook, stirring (not whisking) until the sauce thickens and coats the back of a wooden spoon.

In a separate bowl, cover the raspberries with the 1/4 cup sugar and lemon juice. Mash them with a large spoon.

Combine the raspberry mixture with the cream anglaise mixture and chill for 1 hour. Pour into your ice cream maker and follow instructions for making ice cream. (*optional: Just before the ice cream is firm enough to place in the freezer, add 1/2 cup of chocolate chips). Keep in a container in the freezer til assembling.

ASSEMBLING YOUR SWISS CAKE ICE CREAM BOMBE -

Line a glass bowl with plastic wrap and plenty extra for covering.
Carefully slice the cake into 1 inch thick rounds. Start with two in the center, place the rounds to cover the bottom and sides of the bowl. Cover with wrap and freeze until firm.


Take the Vanilla Ice Cream out of the freezer and let it soften just a bit until you can spread it around the inside of the bowl evenly. Cover and freeze, again until firm.
Take the Raspberry Curd out and spread evenly around the bowl on top of the Vanilla Ice Cream. Cover and return to the freezer to firm.
Last step: Fill the center with the Raspberry Ice Cream, up and around the top. Wrap and freeze until firm and ready to SERVE!

When ready, unwrap and place a plate on top of the bowl. Flip the plate and bowl over. Remove the glass bowl and plastic wrap. If it doesn't happen easily, just wipe the top of the bowl with a warm wet cloth for a few moments and the bowl should release.
Wait just a few minutes, then slice and serve.

Saturday, July 24, 2010

Make Your Own Cheese (plus 3 recipes) - Simple Saturday

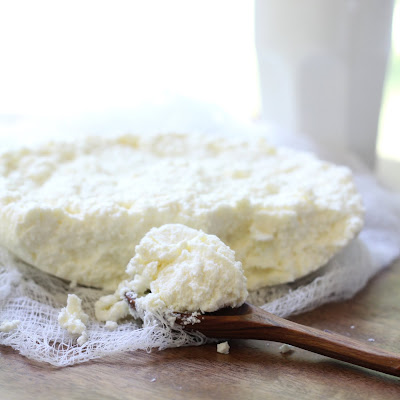
Just in case you haven't heard; making your own Ricotta Cheese is silly simple. I'm serious. It takes three ingredients, minimal skill and a few hours of just waiting.
RICOTTA CHEESE, plus...
Recipe: Ricotta Cheese
4 cups whole milk

1/2 cup heavy cream
1/4 tsp. salt

2 Tbls. Lime juice (or vinegar)


In a saucepan, heat the milk, cream and salt to a full out rolling boil while stirring. After the milk mixture is boiling, pour in the lime juice, reduce the heat and continue to gently stir while the dairy curdles and the whey separates. You'll see clumps forming.


Turn off the heat and let the curdles continue undisturbed for 10 minutes. While waiting, place a cheesecloth in a strainer, then over a bowl. Pour the curdled milk into the cheesecloth covered strainer and let the liquid drain through for one hour.
Then, refrigerate overnight. The next day, remove and put the Ricotta Cheese in a covered container in the refrigerator.
Ok, so you've made your own Ricotta Cheese, now what?

Here are a few ways to use this gorgeous, subtle, creamy Italian cheese.
1) Stir in a few blueberries, or other berries. Top with a few spoons of granola or chopped nuts and drizzle honey or maple syrup over the whole delicious cup o' goodness.
2) Mix 1 cup of Ricotta Cheese with a Tablespoon of parmesan cheese, chopped shallots, sliced garlic, and chopped parsley (or oregano, thyme or dill), a squeeze of lemon juice, 1/2 cup milk and 2 beaten eggs. Then stir in 1/2 cup chopped mushrooms. Pour into a buttered pie dish and bake on 350F for about 45minutes to an hour. Slice to serve.
3) Toast slices of french bread, spread Ricotta cheese on each slice and top with caramelized onions, or diced black olives or chopped tomatoes. Top with a few capers. Drizzle with good olive oil. Serve for an appetizer.


Thursday, July 22, 2010

Cucumber Pickles; Dill with it. **Double Post** Watermelon Rind Pickles

Here's a big surprise: I couldn't make up my mind. There were so many gorgeous cucurbits at the Farmer's Market, that...what? Cucurbits. You know. Cucurbits. Yeah, I had to be told what they were, too. Cucurbits are the vine grown cucumbers, squashes, melons and such. They make amazing jams...and pickles!
Cucumber Dills w/Cumin,Pepper & Mustard Seeds Watermelon Rind Pickles w/ Garam Masala & Jalapeno
At the beginning of the year I joined a group started by Tigress Can Jam/Pickle. She has an amazing site that is packed with her bright personality and intelligent recipes. Each month, our group participates in canning and what we can (the product) is chosen by a host. This month it was chosen by Laundry Etc.
Each one of us have the choice of how we handle the product: jam, pickles, relish, chutneys, etc.. as long as we follow certain guidelines which include the US recommended hot water bath canning process. Like most things, once you get the hang of it - following the process is a cinch.
I'm in charge of making many jars of pickles for my daughter's upcoming wedding, so "cucurbits" in the form of cucumbers were very timely and I'm half-way through the batch size I need for the wedding.

And, watermelon? Well, I'm a southern girl who grew up eating watermelon outside where you could drip it all over you and save the seeds for a spitting contest. True to the South, nothing goes to waste so pickling the rind was a given.
I actually had never pickled rind myself, so once I figured out that watermelon is one of those...Cucurbits, I had to give it a try.
I used several recipes to help me with the safety and correct ratio for vinegar, etc. then changed up the spices and flavoring to suit my whimsy.

Now YOU know what a cucurbit means, too (or maybe you were already vine-savvy). Sometime today, throw that word around a little and see how many people give ya that blank stare. Then send them to my post and I'll help them
get out of that pickle.

Cucumber Dills w/Cumin, Pepper & Mustard Seeds
(adapted from "Jam it, Pickle It, Cure It" by Karen Solomon)

3 lbs.
Pickling Cucumbers (washed, dried, sliced into wedges)

In a non-reactive saucepan, heat 2 cups Vinegar with 6 cups water and 6 tsps. salt to boiling.

Pack your sterilized jars with the Cucumber wedges and an even distribution of these spices:
9 cloves of garlic, crushed
3 cinnamon stick (broken into pieces as needed)
6 Tbls Mixed Mustard seeds
6 Tbls. Dill seeds
8 Tbls. Black Peppercorns
2 Tbls. Cumin seeds
6 tsps. salt


Leave 1 inch head space.
Pour the hot vinegar mix into the jars covering the wedges fully and leaving 1/2 inch head space. Process in a hot-water bath for 10 minutes. Remove, cool and store in a cool dry place.


Watermelon Rind Pickles w/Garam Masala & Jalapeno
(inspired by "Jellies, Jams & Chutneys" by Thane Prince and Whole Foods Recipes)


The Rind of 1 med. watermelon (remove the green with a peeler, scrape off all pink, cut into small cubes) *You should have 1lb. of cubed rinds

For the Brine - Mix the following in a glass bowl with lid:
4 Tb salt

24 oz. Water

Place the rind cubes into the brine, cover and leave in refrigerator for 2 days.

After 2 days: Drain the rind, rinse with cold water several times and drain.
Hold to the side.


In a deep saucepan, add and bring to a boil:
4 cups of water
2 cups Cider Vinegar
9 oz. brown sugar

4" cinnamon stick

1/2 teaspoon Garam Masala ground spice mix

1/2 teaspoon fresh ginger minced

1/2 lemon zest

1 tsp chopped Jalapeno Pepper


Once this is boiling, add the rind into the saucepan and stir to mix.

Lower the heat and simmer for 45 minutes or until the rind is tender and translucent.

Remove from stove and pack your sterilized jars with the rinds, then pour in the pickling liquid to cover.
Keep at least 1/4 inch space available at the top of each jar.
Seal properly and place in boiling water bath for 10 minutes.
Remove and cool on rack without moving for 12 hours.

Keep in a dry, cool area.
If you aren't comfortable with canning: fill your glass containers, cool, cover and keep in the refrigerator for several weeks.

Saturday, July 17, 2010

Buttermilk Brown Sugar Pancakes - Simple Saturday

Is there an easy way to make Diner Delicious Pancakes? Yes, and here it is.
BUTTERMILK BROWN SUGAR PANCAKES
Once you see how easy it is, you can start adding your own chocolate chips, try them with jam in the middle, or experiment with flavorings.
This recipe is easy to double. The batter is easy to make the night before and hold in the fridge. The pancakes are easy to cook ahead - freeze individually - then "toast as you go" for those mornings when you wish you had time to make something...but who does?
It just takes two bowls:
In one bowl:
Sift together 1 1/2 cups flour (all purpose), 1 Tbls. Baking Powder, 1 tsp. salt, and 1/4 cup brown sugar.

In a second bowl:
Whisk together 1 1/2 cups buttermilk, 1 egg, and 3 Tbls. melted butter.

Make a little well in the center of the dry ingredients and pour the wet ingredients into it. Whisk everything together, but just til they're combined.

Heat up a griddle pan, or frying pan on med.
Add a brush of butter, and pour a little batter onto the hot skillet.
When the sides look bubbly and are easy to lift, flip it over and cook on the other side.

OPTIONS: Each person in my family has their own favorite kind of pancake. I make this one batter, and add the extras before the flip when cooking.

Chocolate chips: just sprinkle a few and let them sink in before flipping.
Fruit: cut it up and sprinkle a few pieces before flipping.
Nuts: same as with fruit and chips.

If you'd like to add cinnamon, vanilla or zest; add it to the batter when you blend the dry and wet ingredients.

Who needs a Diner, right? Oh, yeah, except for the clean-up!

Wednesday, July 14, 2010

Grilled Corn with Romesco Sauce (made with Nut Butter) - Daring Cooks July '10

There's a goofy Southern insult that goes: "He was so bucked tooth, he could eat corn on the cob through a picket fence". Being the food-driven gal I've always been, when I heard that saying all I thought was, "Lucky guy, I love corn!"
Grilled Corn on the Cob
with Romesco Sauce

(made from Nut Butter)
The July 2010 Daring Cooks’ Challenge was hosted by Margie of More Please and Natashya of Living in the Kitchen with Puppies. They chose to challenge Daring Cooks to make their own nut butter from scratch, and use the nut butter in a recipe. Their sources include Better with Nut Butter by Cooking Light Magazine, Asian Noodles by Nina Simonds, and Food Network online.

This month's Daring Cook's Challenge was about making your own Nut Butter. Well, I can't imagine a more satisfying and yet simple food. There is essentially ONE step: Pulverize your choice of nuts into a smooth butter in the food processor.
If the nuts are dry (ie. almonds, peanuts) you'll need a drizzle of neutral oil (think canola, etc) to get it really smooth and spreadable. If the nuts have a lot of their own fats (ie. cashews, pistachios, etc) you can even skip that addition. Toasting the nuts first gives them a rich and sweet flavor.

In a matter of moments, you end up with not only a protein filled main event (sandwiches, fillings, etc.), but also an amazingly diverse addition to foods from South Africa to Asia, to South Texas, USA.

Part of our challenge was to use the nut butter in a SAVORY dish. I almost slobbered myself just thinking about all the SWEET dishes I could make with Nut Butter; That was easy. After a few minutes of mourning all the baked goods I was already tasting in my mind, I realized how many savory dishes could be knocked up a notch with nuts.
I chose an easy one (or my schedule chose it for me), and it reminds me of times when I lived in Houston, Texas. It seemed like everything had barbecue sauce, or chili peppers on it, and that was fine by me. I did a little "culinary upgrade" on the regular barbecue sauce and made ROMESCO; A warm, peppery, earthy Spanish sauce that needs to be on your "use with everything" list.

Romesco originated in Spain and often uses Ancho (pronounced Aahnn-cho) peppers, which are dried Poplano. You can make it spicier with Chipotle, or bring it way down, but hearty with roasted red peppers. Romesco gives fish, grilled veggies, soups, chicken, steaks, pasta and sandwiches a "mumble" factor. That's when something's so good, folks want to talk about it while they're chewing, so all they can do is mumble.

RECIPE: ROMESCO w/Nut Butter

3 Tbls. Nut butter (from 1/4 cup Almonds, and 1/4 cup peanuts)
2 Ancho chilis
2 pieces of stale bread, in pieces
3 cloves garlic
2 tomatoes
1 Tbls. lemon juice
1 Tbls. brown sugar
few sprigs of parsley
salt/pepper to taste
1/4 cup Olive Oil

1) Place the dried Ancho chilis in a cup, add boiling water, cover and soak to reconstitute for 30 minutes.

2) While they soak, place the tomatoes and peeled garlic cloves on a parchment lined pan and roast in the oven 350F, for 30 minutes. (Or use these from your MISTO FORNO in a previous post.)

3) Remove the chili from the water, seed and chop large. Let the tomatoes and garlic cool.

4) In a food processor, add the chilies, tomatoes, garlic, salt, pepper, parsley, lemon juice, nut butter, brown sugar and bread. Process til smooth.

5) Pour in the oil, continuing to process until you have a nice spreadable paste. Taste and adjust seasoning as needed.
GRILLED CORN on the COBB:

1) Remove silks, but replace husks on 4 Corns.
2) Soak the corn in water for 30 minutes.
3) Soak the skewers in water for 30 minutes (this is so they don't burn dry)
4) Grill the husk covered corn for 20 minutes in a covered grill on Med/High. Check often and turn to all sides.
5) Cool the corn, remove husk and cut into individual pieces.
6) Skewer each piece and slather on the Romesco Sauce.
Grill to reheat and warm up the sauce.
Serve warm.

One big bite of this Grilled Corn with Romesco and the tip of your tongue jumps up in attention, then is calmed by a little sweetness on the side. Ahhh, summer.