Saturday, May 7, 2011

Easiest Nutella Cookie Ever - Simple Saturday and Gluten Free

I'm not kidding, this is so easy I'll give the ingredients first: 1 Cup Nutella + 1 egg.

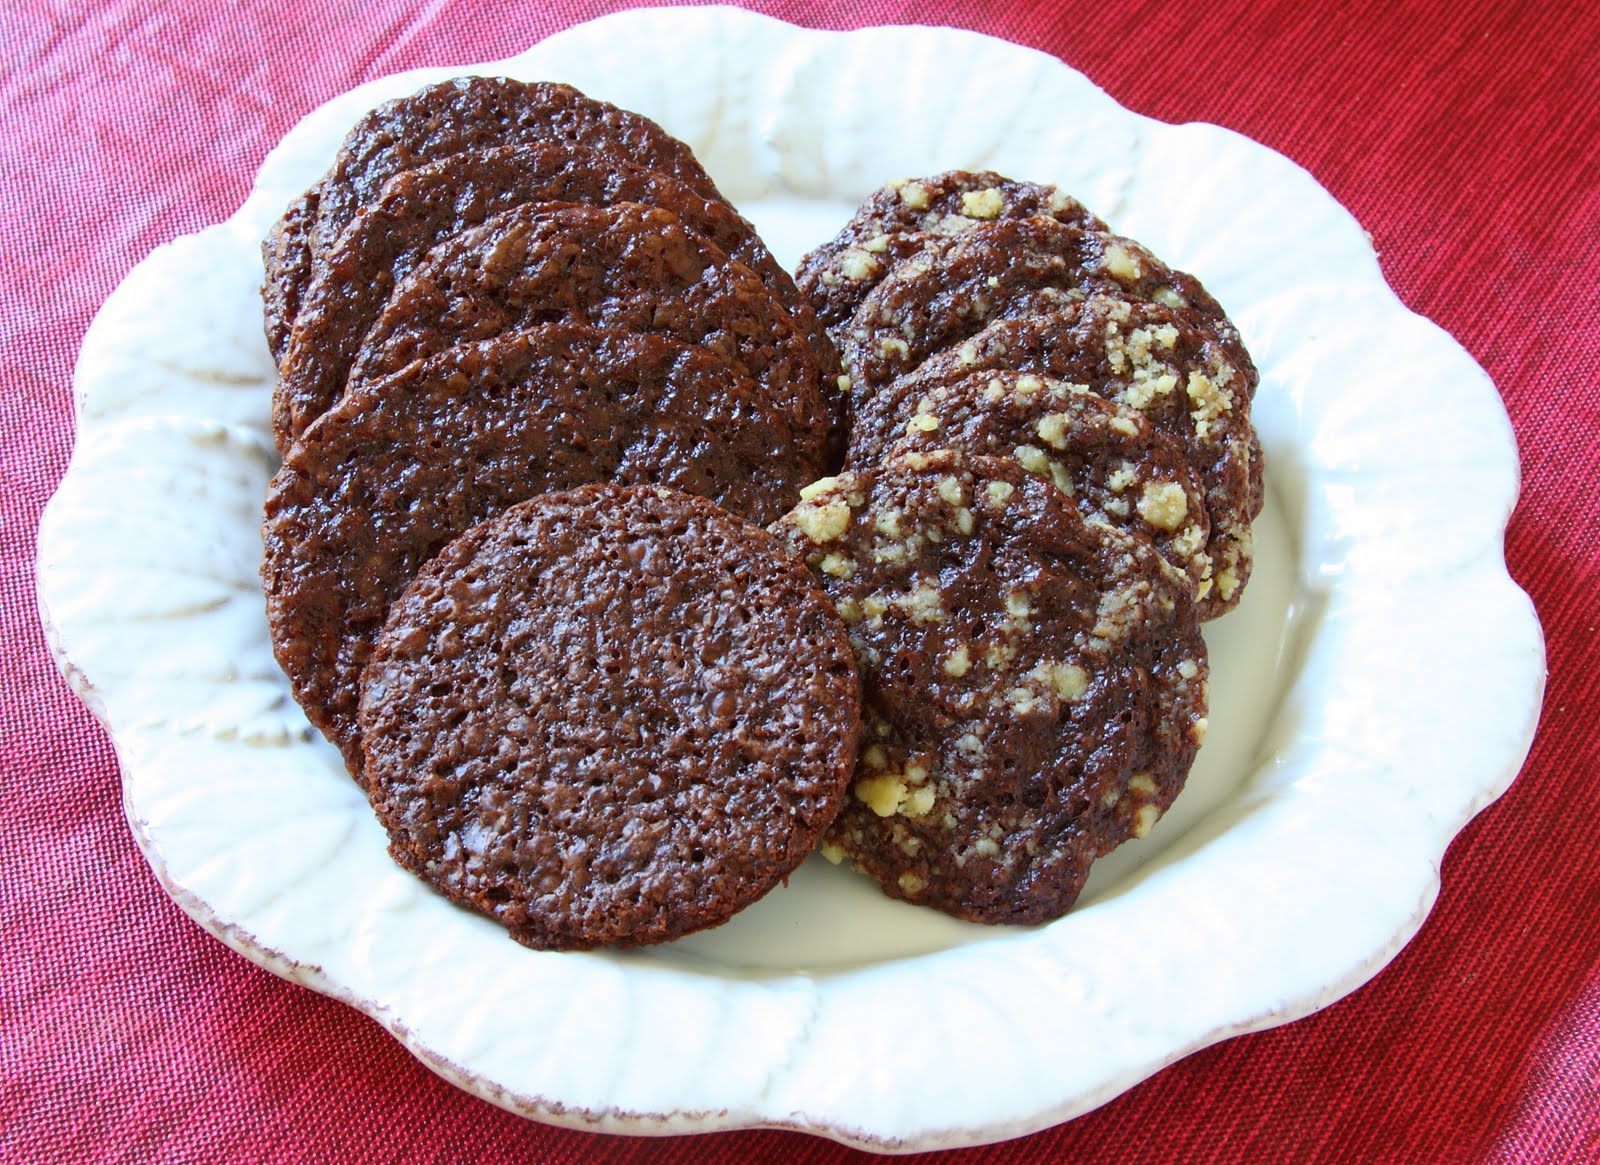
CRISPY CHEWY NUTELLA COOKIES

This recipe came about because my Nutella Cookies didn't have enough Nutella taste for my obsessive palate. I wanted the taste of "Nutella-on-a-spoon" (you KNOW you know what I'm talkin' about), but in an easy carry-around serving size.

I had made "Easy, No flour, Almond Butter cookies" with just one egg, so maybe this would work too?

It does. Oh, it does.


You know how the best part of a brownie is the chewy edge or crispy top? (They've even made brownie pans that give you more edge because so many of us love that part.)

They've made muffin pans so shallow that all you get are muffin tops (the ones we like to eat, not the ones that are a result of it.)

Well...these cookies taste like brownie edges. They are a hand-held mixture of crispy and chewy. They are "tote-able Nutella". They are dangerous.
Some of these I rolled in crushed walnuts (hazelnuts would be fabulous, but I didn't have those in the pantry.) They spread a lot, so be sure to give them plenty of room. Go get your Nutella-fix. It will take you all of 20 minutes.

Crispy Chewy Nutella Cookies:

1 cup Nutella

1 egg


1) Mix these two ingredients together in a bowl. Be patient - start whisking slowly, then harder until fully incorporated. The batter will be very loose.

2) Drop by small spoonfuls onto a parchment or silpat lined baking sheet. 3) Bake in a preheated 350F oven for 8-10 minutes. ( I turned my pan half-way through for even cooking.)

The less cooking makes them more soft and chewy, the more cooking increases the "crispy". Check it according to your own oven heat and the size of the cookies you make.

**Optional - I didn't get a picture of these, but they were also good sprinkled with powdered sugar, or sandwiched together with cream cheese.


Nutella tote-ables, oh yeah. :D

Friday, May 6, 2011

Nut Milk - I'm Not Kidding

I'm going to blame having a teenager in the house for the fact that I can't say the words, "Nut Milk" without laughing. And I don't mean just in a scatological way, but the sound of it, too. I would expect to read it in a Warner Bros Looney Tunes manual. I would expect "Scrappy the Squirrel" to have Nut Milk. And now, I have a bottle of chilled & creamy Nut Milk in my refrigerator (snicker snicker.)

Almond Nut Milk
Here's the reality: Nut Milk is not only filling, full of fiber, chock full of nutrients - it has a really deep flavor that dairy milk (especially non-fat) is sometimes missing. For almost two years, I've been posting recipes with a very fun online group of friends called "Lets Lunch". What started as an idea for a "virtual lunch" with Cheryl (A Tiger In The Kitchen) and Elise (Cowgirl Chef) who live in two different parts of the world, has turned into a monthly online lunch club (that anyone can join) with people all over the planet.The special thing about today's "Lets Lunch" is that it represents the best of what blogging, tweeting and Face Booking can do: Bring together real people with real feelings for a real moment. One of our very fun and talented "Lets Lunch" buddies is on a restricted, all liquid diet as she successfully recovers from Cancer Surgery. So, this month - we all are posting liquid lunch ideas. It's a virtual way of sending a real message of love and support, while also posting some very cool liquid lunch ideas.
Almond Nut Milk Granita
(see directions for Granita here)

Maybe that's also the reason I can't say "Nut Milk" without laughing. It's the joy. Yeah, I'll admit it. It gives me great joy to think of ways that food and friends can come together for something very real life, using our virtual capabilities. I researched for a while before deciding I wanted to make something a little different (for me) that also introduces a new ingredient idea for other cooking. Even if it's just another way to make Chocolate Milk or a Healthy Smoothy.
Almond Nut Milk, Banana & Honey Smoothy
Join us in wishing a speedy recovery to Karen. Go check out the inventive liquid "Lets Lunch" posts from around the world. Enjoy making and drinking Nut Milk (pause for laughter), knowing that it's healthy, and can be used to replace dairy in baked goods, cereals and for a lot of your cooking liquids.
Almond Nut Milk Cappuccino

There are many different kinds of Nut Milk, including Cashew, Pecan, Pine Nuts and even Macadamia nuts. I tried Almond Milk because I've worked with them before and the taste is full, but with room to add flavorings too. I found the Ratio of nuts to water was about 1 cup of nuts to 3 cups of water, but you can experiment to see how thick or light you'd like it. I didn't add sugar, but I think a touch of Agave, Stevia, Honey or your choice of sugar would taste great.The researched tips suggested always using filtered water, and to keep Nut Milks refrigerated (since they're not pasteurized) for 2-4 days only. RECIPE: ALMOND NUT MILK

1 cup raw organic almonds

3 cups filtered water (heated)

1/2 Vanilla Bean


**Optional: cocoa, lavender,
honey, banana, caramel sauce, sweetener.

1) Soak the almonds in filtered water for at least 8-12 hours or overnight. Rinse and drain.
2) In a food processor, add the almonds and pulse til ground, but not into Nut Butter.
3) Split and scrape the vanilla out of the 1/2 vanilla bean (or a tsp vanilla paste) and add to the almonds, along with the heated water.
4) Puree together - taste and check along the way to please your own palate.
5) Strain the Nut Milk through double thickness of cheese cloth or through a Jelly bag. 6) Keep in a clean bottle in the refrigerator for drinking, baking (or my fav: adding chocolate, a banana & a tsp. honey and frothing it into a smoothie, Mmmm)

Join us for the next "Lets Lunch" by typing #letslunch into Twitter or leaving a comment here for me to contact you. We'd love to get to know you, and post together. Sending you sincere wishes for health and happiness and "Nut Milk" giggles.

See all of these fun and thoughtful posts for Lets Lunch:

Peanut Butter-Espresso Smoothie - Cooking in The Fruit Bowl

Miso Bacon Corn Chowder - A Tiger In The Kitchen

Cucumber-Avocado Gazpacho - Cowgirl Chef

Spring Greens Soup with Homemade Baguette - Caitlin Shetterly

Spring Pea & Mint Soup - Hot Curries & Cold Beer

Gazpacho - The Kitchen Trials

Turnip, Chinese Mushroom & Pork Soup - Be a Wok Star


Wednesday, May 4, 2011

CampBlogAway & Spicy Avocado-n-Bacon Frozen Magarita Recipe

I went to Camp and all you got was this
Spicy Avocado Bacon Frozen Margarita recipe.

Why would anyone drive hours from home into the mountains of California and sleep in a cabin to talk about food blogging?

Because it's FUN, people, it's FUN!


Not only was CampBlogAway fun, it was inspiring. Yeah, I know that word can be overused. But when you leave a place with the feeling of energy and renewed focus because of other people's lives, viewpoints or challenges they overcame - what else can you call it?

Joy (
Joy the Baker), an extremely successful gal, let us in on her secret to a great Food Blog: Write from the heart, be yourself, give your best and they will come.

Cheryl
(5 Second Rule) and Susan (Food Blogga) reminded us that building a "community" and reaching out to others, paying attention to who reads our blogs, and staying accountable for what we put out there will result in a larger community and a better planet.

I call that inspiring.


Not only was
CampBlogAway inspiring, it was informative.

I didn't know that
Idaho Potatoes are naturally capable of being crisp on the outside and firm, but fluffy on the inside because of the Volcanic minerals in the soil of Idaho.


I didn't know that
Fiji Water was helping villages receive water supplies for themselves, as well. I didn't know you could buy eggs (SafeEggs) that are pasteurized, therefore no worries of deadly salmonella.

I didn't know that
fondant is so easy, anyone can create beauty. I didn't know that Wente Vineyards have such a light, crisp Chardonnay. I didn't know the inside of a California Avocado (next to the shell) has the most nutrients.
I didn't know that Patti (Worth the Whisk and camp captain) was a Virgo (structured, yet nurturing, humorous and inventive). I didn't know that Rachel (LaFujiMama) and Dara (CookinCanuck) could talk and laugh until 2:30 in the morning, just like me.

I call that informative.


CampBlogAway was like being a teenager, away at camp with buddies...
...except there's wine and better food.
A special thanks to Diane (CreatedBy-Diane) for the buttery Lemon Poppy Seed cookies that got me through my afternoon munchies.

To cap off my adult adventure and use one of the perfect avocados I got from camp,
and to send us into Cinco de Mayo - here's a savory, almost healthy (wink, wink) cocktail. SPICY AVOCADO & BACON FROZEN MARGARITA: (serves about 4)

1 ripe Avocado (peeled and chopped)

1/2 Jalapeno (chopped)

6 Slices of Bacon (cooked crisp)
3 oz. Tequila (can use Vodka)

2 oz. Triple Sec or Cointreau

4 oz. Lime Juice or Sour Mix
ICE


1) In a blender, start with a little ice, then add the avocado, jalapeno, 1 slice of the bacon, the Tequila, Triple sec (I used Cointreau) and lime juice. Puree this, then add more ice until it reaches the consistency you like.


2) Taste along the way and increase the lime juice or ice as needed.


3) Separately, grind 3-4 slices of crisp bacon into dust for garnishing the glass edges and use the rest of the bacon pieces as swizzle sticks.
This is a savory tasting cocktail, not sweet like the fruity ones. Serve immediately for a creamy texture or hold in refrigerator and stir briskly for a more liquid version.

Friday, April 29, 2011

Dandelion is the new Kale - Simple Saturday

Dandelion Chips w/ Sea Salt
Kale Chips have been king long enough. Actually, I love Kale Chips and I've watched so many friends and kids who thought they didn't like greens end up snacking away on baked and seasoned Kale Chips by the dozen. If for any reason, you have not tried them - the simple recipe is the same as the one I've included here for Dandelion Chips. I have a bit of an obsession with Dandelions, as you can read about here (Dandelion Sun-dried Tomato Bread Pudding.) On my quest to see just how many products I can actually make with these loyal, fierce and underestimated miracle plants, I tried Dandelion Chips.

They bake up so easy and I can't wait to try them with different seasonings: chipotle powder, curry or maybe powdered chives (Mmmm.)As you might expect, Dandelion Chips are more delicate than the hardy and curly Kale, and the taste can be more bitter (a nice break from the too sweet and processed bagged chips.) I loved these with sea salt sprinkled all over. They melt in your mouth like dandelion air, and I think they'd make a perfect garnish on mashed potatoes, added to salads, or crushed and sprinkled over casseroles. Dandelion Chips:

1) Wash, dry and break dandelion greens into large pieces. Discard any thick ribs.

2) Drizzle a bit of Olive oil on the greens and toss with your hands to lightly coat all the leaves.

3) Place in a single layer onto a baking sheet. Bake at 350F for about 8-12 minutes. Keep an eye on them so not to burn.

4) Remove pan from the oven, sprinkle the leaves with seasonings (I used Sea Salt) and allow to cool. That's it - simple~ Let me know if you try Dandelion Chips and if you have ideas for other ways to use them. Have a dandy day :D

Wednesday, April 27, 2011

Maple Mousse in Sweet Potato Chips with Bacon Crisps

Did I have you at "Maple Mousse"? Or was it "Sweet Potato Chip"? If one of those lip-licking titles got you, then I bet the "bacon" part made your finger hit the "go to" key, right?

Maple Mousse in Sweet Potato Chips
w/ Bacon Crisps
The April 2011 Daring Bakers’ challenge was hosted by Evelyne of the blog Cheap Ethnic Eatz. Evelyne chose to challenge everyone to make a maple mousse in an edible container.

I've been having a blast cooking along with the Daring Cooks and the Daring Bakers every month for almost 2 years. This month, for the first time, the two challenges worked together and asked us to create "edible containers." For the Daring Cooks we make savories, and now for the Daring Bakers we're making sweets.

Mousse is a very simple and validating dessert to make for yourself, family or guests. There is just a bit of prep, then you toss the whole thing in the refrigerator for when you need it. Mousse can be served in a glass by itself or garnished, and you can also use it as a filling for chocolates, cakes, cookies, or tarts.
I make a lot of small appetizers or nibbles in my catering life, and Sweet Potato chips are handy and healthy (not to mention delicious) edible containers. Bacon crisps for a garnish seemed like the perfect topper to the combo of maple and sweet potato. I'd love to say that I ate a few of these, but that would be a giant understatement.

RECIPE: Maple Mousse

1 cup (240 ml/ 8 fluid oz.) pure maple syrup (not maple-flavored syrup)

4 large egg yolks

1 package (7g/1 tbsp.) unflavored gelatine

1 1/2 cups (360 ml. g/12 fluid oz) whipping cream


Directions:

1. Bring maple syrup to a boil then remove from heat.
2. In a large bowl, whisk egg yolks and pour a little bit of the maple syrup in while whisking (this is to temper your egg yolks so they don’t curdle).

3. Add warmed egg yolks to hot maple syrup until well mixed.

4. Measure 1/4 cup of whipping cream in a bowl and sprinkle it with the gelatine. Let it rest for 5 minutes. Place the bowl in a microwave for 45 seconds (microwave for 10 seconds at a time and check it in between) or place the bowl in a pan of barely simmering water, stir to ensure the gelatine has completely dissolved.

5. Whisk the gelatine/whipping cream mixture into the maple syrup mixture and set aside.

6. Whisk occasionally for approximately an hour or until the mixture has the consistency of an unbeaten raw egg white.

7. Whip the remaining cream. Stir 1/4 of the whipped cream into the maple syrup mixture. Fold in the remaining cream and refrigerate for at least an hour.

8. Remove from the fridge and divide equally among your edible containers.

Recipe: Sweet Potato Chips

1 large Sweet Potato (peeled and thin sliced with a mandoline)

1) Preheat oven to 350F, place slices on parchment lined baking sheet.
2) Bake for 8 minutes, remove slices to a small muffin tin or an egg crate ceramic (as seen above) and continue to bake for about 4-8 more minutes until crisp (they crisp more while cooling.)

(There is also a quick way to make Sweet Potato Chips in the microwave.)

Allow the Sweet Potato Chips to cool, then fill with cooled Mousse (using a pastry bag and star tip), then garnish with crisp bacon pieces.

Thanks for stopping by :D

Thursday, April 21, 2011

StoveTop Smoked Fish - A Crowd Pleaser

Stovetop Tea Smoked Fish done at home is like camping with a little style and... less dirt in your food. When I serve this at a party or bring it to a friend's house it's always accompanied by "wows and woos". There's always at least one guy who can't believe I smoked it myself, at home, with tea.
Tea Smoked Black Cod
I've written about Tea Smoked Salmon and in that post I gave a picture-filled HOW-TO using just foil and a casserole pot. This time I used a cast iron stove-top smoker (by Emerilware) that I've had for awhile. If you're interested (and there are a lot of uses for one), I found a different style at Chef's Catalog "StoveTop Smoker" right here.

(tea/rice/brown sugar/seasonings)
The other day I was thrilled to be a part of a video shoot for I Love Blue Sea - an online site for ordering fresh sustainable seafood. Along with Rachel at Fuji Mama, Allison at Sushi Day, and Greg at Sippity Sup, we prepared several recipes for I Love Blue Sea and they'll be running on that site soon (stay tuned.) When the shoot was over there were several seafood items left for us to take home with us. I did not have to be asked twice and I scored a gorgeous Black Cod and a dozen Green Lipped Mussels (post to come soon.) One of the handy facts about Tea Smoked Fish is that you can keep it in the refrigerator for a couple days and it still has a deep smokey flavor and since Black Cod is a moist, fatty fish with tons of good things going on for you-- - the thick flaky fish holds in the moisture and the earthy tea seasonings the whole time. I pretty well stayed to the same recipe as for the Tea Smoked Salmon, so check out that post HERE for details, along with the pics posted.

Black Cod Fish Tacos with Fried Radish
Thanks for stopping by, and smoke on! :D